Set 12:00 hours
This option is used to calibrate the time on the record sheet.
If you think that the program misread the start time of activity on the record sheet, check if 12:00 o'clock is set correctly.
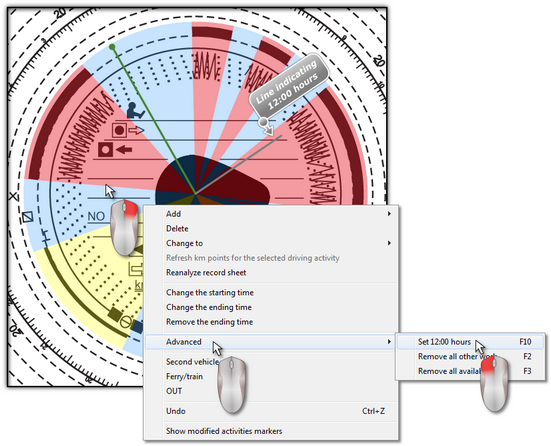
The figure below shows an example of the wrong setting of 12 o'clock. The grey line ocation should be the same as 12 hour on the disk, i.e. in the centre of the ‘tear’ (see: Fig. bellow).
Change of 12:00 hour can be done on both tabs containing an image of the scanned disk with recognized events marked on it, i.e. "Basic data".
12:00 hrs can be changed in two ways:
•right click anywhere on the record sheet image (Fig. bellow), and then, from the drop-down menu, select: Advanced -> Set 12:00 hours;
•press: ![]() .
.
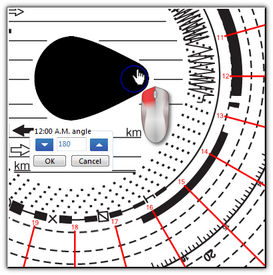
Colorfully marked events will disappear from the disk’s image and a red circle meaning location of the 12 hour on the disk will appear, plus a window showing the deviation angle of the 12 hour and ancillary lines showing hours on the disk.
In order to change location of the 12 hour, click and hold the mouse left button on the circle symbolizing it (Fig. above), then, moving the mouse cursor, place the circle in a new position.
When being moved, the clock in the top left-hand corner will be replaced with the number of degrees showing. |
|
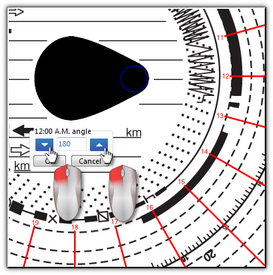
Precise setting can be obtained by clicking the window "12:00 A.M. angle" one of the two black triangles (Fig. above).
Correct setting of the 12:00 hour (always in the thinner end of the ‘tear’) can be achieved when the ancillary lines overlap hours on the disk. |
|


