All documents entered to program will be visible on the list depending on the tab chosen. The list can be opened in several ways:
•click on the:  icon located in the Basic data tab in the toolbar;
•from the Basic data main menu, select Documents.
Each added document may be linked with file or scan (see: lists toolbar).
The documents added to the list of documents will be visible also in the tabs (ex. driver, vehicle, business trip etc.) with which they were linked. And all documents added in the appropriate tabs will be visible on the list of all documents.
Add/edit the document window consists of the following tabs:
To record a document, simply fill in a document type.
If there is no desired document in the document type list, you can add it to the list (i.e. dictionary) using the icon:  . .
|
|
Additionally, you can fill in the remaining fields at your discretion.
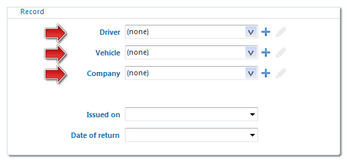
If in Record field (Fig. bellow), the box: Driver, Vehicle or Company is filled in, the document is attached also to this register.
Agenda - option available after the introduction of Expire date of a document. It lets you add, edit or remove the document expiry date to/from the agenda, without opening it;
|
|
 Fig. Tab: "basic data". |
|
Some of the windows offer the possibility of linking the entered items with any files, and even scanning and linking them with any document.
1. - (Fig. bellow) - New- adding a file: to add a file simply click this icon with the LMB, then in the new window, select the file and press - (Fig. bellow) - New- adding a file: to add a file simply click this icon with the LMB, then in the new window, select the file and press  . In the Files field, a path with the file name is displayed and in the File preview field the file contents is displayed. . In the Files field, a path with the file name is displayed and in the File preview field the file contents is displayed. 2. - Delete - removes file from the list. - Delete - removes file from the list. 3. - Scan: to scan a file, click this icon with the LMB, and the program will display a window asking for the name under which you want to save the scanned document. Then, if the scanner is connected, "Scan settings" window appears, depending on the type of scanner. After adjusting the settings, click [Scan]. Similarly as in the case of adding a file, the list below shows the path along with the file name and the File preview field displays its contents. - Scan: to scan a file, click this icon with the LMB, and the program will display a window asking for the name under which you want to save the scanned document. Then, if the scanner is connected, "Scan settings" window appears, depending on the type of scanner. After adjusting the settings, click [Scan]. Similarly as in the case of adding a file, the list below shows the path along with the file name and the File preview field displays its contents. 4. - Copy file to ... - allows you to copy the selected file to any directory. - Copy file to ... - allows you to copy the selected file to any directory. 5. - Send the file via e-mail - opens a dialog box to send a new e-mail with the selected file. - Send the file via e-mail - opens a dialog box to send a new e-mail with the selected file. |
|
|
|
|
|
The type of document (driving licence), its series and number will be automatically entered to program after reading of data from driver’s card (see: TachoScan module).
|
|
![]() icon located in the Basic data tab in the toolbar;
icon located in the Basic data tab in the toolbar;
