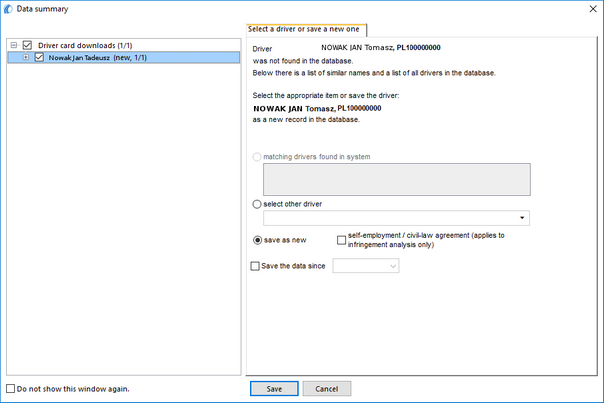
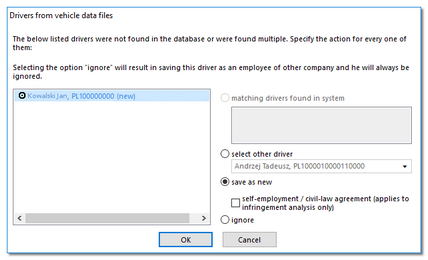
"Save a new driver" window
The window will display drivers that are not in the database. Each of the drivers can be assigned a specific action ("save as new" by default)
Depending on the data source (driver card, tachograph), the following actions are available in the window:
When choosing a similar or different driver's name, be careful and make sure that the designated driver is the correct one. |
|
Matching drivers found in system
This item is marked by default, if the program finds at least one similar driver's name in the database. In the list, below the options, you will be able to select the driver to which the downloaded data will be assigned.
Be careful when selecting a similar driver's name and make sure that the selected driver is correct. If an incorrect driver's name is selected, cancel or change it into a correct driver card number in the driver editing window (see: "Driver"), and then open every incorrect day for edition (see: "Driver card and record sheet data") and change the driver's name into a correct one. |
|
Name (names) and surname of the driver is saved in the memory with Latin letters – no Polish fonts. Example: Żółty Ksawery Józef will be saved in the memory as Zolty Ksawery Jozef. In the bracket, next to the driver’s surname, there is the company by which he is employed. |
|
Select other driver
Should be chosen, when other driver's data must be recorded.
Save as new
This item is marked by default, when the system fails to find either an identical or similar driver's name in its database.
Save the data since (reading from the driver card)
After marking that option one may choose from which date the digital data will be saved in the data base.
Ignore (reading from the tachograph)
Saving of the driver and his/her data will be omitted.
The indicated driver will be treated as an employee of another company and will ALWAYS BE OMITTED! |
|
The option: Add template is activated after selecting the Add employment field (item a - see "Employees -> Contract"). |
|


