Driver’s daily chart can be edited and offers the following options:
   - allow to zoom in and zoom out all daily charts or return to the default size. - allow to zoom in and zoom out all daily charts or return to the default size.
|
|
 Fig. Graphic view of a day from a driver's card. If data have been retrieved from the digital tachograph for a chosen driver's card day, than the daily chart will show the markings of inserting and removing the driver card (Fig. bellow).
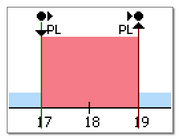
Events: start/end, (inserting/removing the card, manual entry) are recorded on the driver card as the same type of event. Thus, a situation may occur in which there will be several consecutive inserts and removals of the card with change of location visible on the chart.
Detailed recording of the above events is performed by the tachograph itself. And in the program it is presented on the activity chart from the tachograph (see: "Digital tachograph data" - description: "Digital tachograph data preview window -> activities on a specific day, Activities, events and faults in the table or Card insertions and withdrawals").
|
|
|
|
Editing a driver and a vehicle
|
|
In the daily visualization window, you can assign a given day taken from the driver's card to any driver. To do this:
•click LMB on the icon  next to the driver selection field; next to the driver selection field; •in the new window, in the field Driver change (Fig. bellow) select a desired driver; 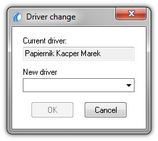 Fig. Driver selection. •click LMB on  . . |
|
In the daily visualization window, you can assign a given day taken from the driver's card to any vehicle. To do this:
•click LMB on the icon  next to the vehicle selection field; next to the vehicle selection field; •in the new window, in the field Vehicle change (Fig. bellow) select a desired vehicle; 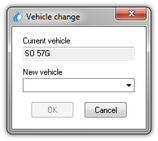 Fig. Vehicle selection. •click on  . .
If the "Enable assistants" option has been checked in program settings then below the basic data field the assistant selection field will be displayed (see: "Settings -> TachoScan").
To change or add an assistant make a selection from a list, as it is the case for analogue disc.
|
|
|
|
|
|
Original entries of start and end countries downloaded from the tachograph are be presented in black.
Entries edited or added in the program are presented in blue.
|
|
Adding:
1.Right-click in the place of entering the country - select Entry of the country from the drop down menu. 2.In the new window, select the hour, check Country at the beginning or Country at the end and then select the country. 3.Click  - the program will insert a blue entry mark. - the program will insert a blue entry mark. Editing:
1.Click and hold the left mouse button on the entry mark and then move it to the desired position (Fig. bellow). 
Removing:
1.Right-click on the country entry mark that you want to delete and then select Delete from the drop down menu. |
|
Marking an area by placing two brown vertical lines on the chart (Fig. bellow).
In the Activities tab, in Selected area window, you can view the sum of the events from the selected area. The lines are marked by a single clicking with the mouse left button on a chosen point.
 Fig. Marking the area. Marking can be removed by clicking the chart with the mouse right button and choosing the option: Remove selection line or Remove all selection lines (Fig. bellow),
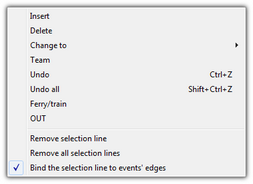 Fig. Removing markings. In the drop-down menu, there is Bind the selection line to events' edges option (Fig. above) - if line is dragged near the beginning or end of an event it allows to snap it automatically to the beginning or end of the event, respectively.
|
|
Add, edit and delete events
The program allows you to add, move and delete events downloaded from the driver card.
If the "Select a vehicle so that you can edit data" prompt appears instead of the "Editing blocked" field, it means that the driver - for the day under consideration – has records from at least two vehicles. In such a case the window will be modified as follows:
- the mileage counter status showing kilometres on start and return is hidden,
- the "Change vehicle" button is blocked,
- records for all vehicles will be visible in the list of activities, in the summary, and in windows showing locations, events, failures and annotations (if a particular vehicle is chosen, then, only records for the vehicle will be visible in the above mentioned windows).
To unblock the elements listed above, select the specific vehicle registration number in the "Vehicle" field.
|
|
|
|
hen you hover the mouse over the area at the border of two activities (the cursor changes to "  " - Fig. bellow), press the left mouse button and holding it (item 1) drag outside the limits of the event, and then drop it. " - Fig. bellow), press the left mouse button and holding it (item 1) drag outside the limits of the event, and then drop it.
 Fig. Shifting events. To change an event type, click the right mouse button on the edited event (Fig. bellow), next use the option: Change to from drop-down menu and select a desired event type.
If a driver fails to change the records card withdrawn in the tachograph, the following options will be useful in completing such events:
- "?" less than 5 minutes for a stop,
- All "?" has a stop.
|
|
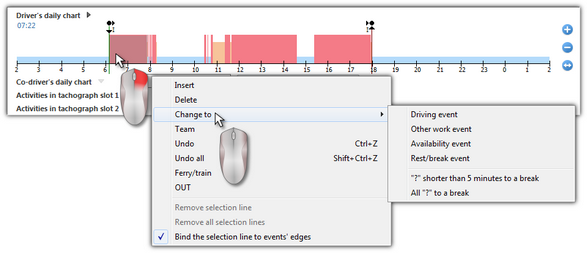 Fig. Change of an event type. |
|
From drop-down menu (see: the topic below), select the command: "Insert". Choose the type of an event, the hour of start and end in the new window (Fig. bellow).
Checking the option: "add at stopovers and card withdrawn only" will considerably facilitate filling in the working day by the driver, since added events do not change the recording of the events related to driving, work and availability hours, therefore any range of hours can be set covering the events mentioned for the purpose of e.g. input of a work event.
|
|
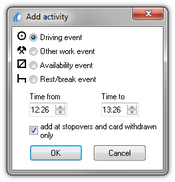 Fig. Event adding window. |
|
To delete a given event, click the right mouse button on it, and then choose the command: "Delete" from drop-down menu.
The place of a deleted event is filled up by an event that follows it.
|
|
|
|
If we have a digital tachograph reading (the same vehicle) for the edited day, then it is possible to copy data from the tachograph to the location of the event card withdrawn (mark " ? ").
|
|
|
|
Dropdown menu
The view of drop-down menu, activated by clicking it with the mouse right button:
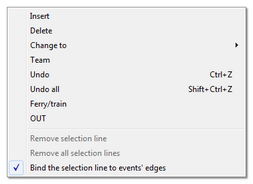 Fig. Drop-down menu. |
|
Choosing this option from the menu causes that a new window will open in which you can choose the type of event to be inserted (edition unblocked). In the bottom part of the window one should specify the start and end hour of the event being inserted (see: Add, edit and delete events).
The event will be saved on the chart under the symbol CW.
|
|
Deletes currently marked event.
|
|
Changes currently marked event into a different one.
|
|
This option is for marking events as team ones in the case when the second driver, for some reasons, .did not insert his card into the tachograph. If a given event has already been marked as a team one, a suitable symbol will appear next to the command "Team" (Fig. above);
If driver’s cards are inserted into both slots of the tachograph, then all events, regardless of their type, are saved as team ones. When one of the cards is removed, team recording is stopped.
|
|
|
|
Undoing one change. when this option is clicked several times, a number of last made changes will be undone;
shortcut:   
|
|
This option is used to mark events pertaining to driving up to a ferry or a train in the case when a driver did not activate it on the tachograph. If a given event has already been marked as a drive-up to a ferry / train, a suitable symbol will appear next to the command "Ferry / train" (Fig. above).
The driver can activate the tachograph so that a given drive-related event is saved as a drive-up to a ferry / train.
It is recommended to indicate only these drive events that actually interrupt a driver’s daily rest time, yet not more than twice – with other activities that last no more than one hour (art. 9 clause 1 of the Regulation (WE) No 561).
|
|
|
|
When driving a vehicle equipped with a digital tachograph the driver can save events on the OUT card – the events do not undergo analysis as far as the Regulation (WE) No 561/2006 is concerned. This option is significant when controlling the driver’s driving time. In the daily visualization window the events are marked with the symbol: OUT;
|
|
Removes the vertical line: (Selecting).
|
|
|
|
In order for the changed data to be recorded in the database they should be saved by clicking the button  in the tab’s right-hand corner. in the tab’s right-hand corner.
Days from card can be saved with a status: "unlocked" or "locked":
• - If a days from card is saved with the "unlocked" status, every user having privileges to use the TachoScan module will be able to edit or delete such data. - If a days from card is saved with the "unlocked" status, every user having privileges to use the TachoScan module will be able to edit or delete such data. • - If however the days from card is saved with the "locked" status, then ONLY users who have been granted privileges listed below: "to edit locked disks in the TachoScan module" (see: "Admin settings -> Users") will be able to edit or delete them. Other users will be able to open such days in order to view them (to read). - If however the days from card is saved with the "locked" status, then ONLY users who have been granted privileges listed below: "to edit locked disks in the TachoScan module" (see: "Admin settings -> Users") will be able to edit or delete them. Other users will be able to open such days in order to view them (to read).
By default days from card are saved with the status: "unlocked".
If data are missing or are incorrect, a suitable message will be displayed.
|
|
|
|
1.Status - It is possible for each day from the card to check the following fixed, choosable status (incorrect operating of the mode switch, Lack of required activities data) and/or select from Status list the following ones: AETR, needs correction, needs explanation, no activities, no recordings, offences, OUT, service, unreadable..
Next to the status field there's an icon:  , that may be made use of to add new day status from the card to the vocabulary. , that may be made use of to add new day status from the card to the vocabulary.
On the "Driver card and record sheet data" list, days from the card may be filtered according to the above statuses.
|
|
2. - "Certifikates"; - "Certifikates"; 3. - "Scanning documents or attaching files"; - "Scanning documents or attaching files"; 4. - "Weekly chart"; - "Weekly chart"; 5. - "Monthly chart"; - "Monthly chart"; 6. - "Driver's available working time". - "Driver's available working time". 7. - "Print activities"; - "Print activities"; 8. - "Print piktograms". - "Print piktograms". |
|


